Key Takeaways
- Black mould trapped under silicone usually means the seal has failed below the visible surface
- 100% sanitary silicone performs better in wet areas than cheap acrylic caulk
- New silicone will not bond properly over old residue, soap film or damp joints
- Recurring silicone failure can indicate movement, poor falls or a larger shower waterproofing issue
Why Re-Siliconing Matters
You've scrubbed that stubborn black spot in the shower corner a dozen times, yet it simply won't disappear. According to home maintenance experts, that dark stain usually isn't surface dirt at all, but rather mould growing underneath the caulking. This hidden growth indicates sealant failure, meaning moisture has already bypassed your bathroom's primary line of defence.
Think of this rubbery line as a flexible gasket for your house, designed to stretch and compress every time your bathtub naturally settles. In practice, a high-quality silicone shower seal acts like waterproof glue that tightly grips the substrate - which is simply the bare tile and tub surface underneath. Once that critical bond breaks, water sneaks directly into your wall cavities to rot the wooden framing.
Fortunately, you don't need an expensive contractor to fix this vulnerability. If you're asking how much does it cost to re silicone a shower - or simply how much to re silicone shower seams - the cost to re silicone shower joints typically hovers around $200 for a pro, while a $25 hardware store toolkit is all you need to re silicone shower edges yourself. By investing just one Saturday morning, you can easily prevent up to $2,000 in devastating structural water damage.
Why 100% Silicone Beats 'Cheap' Acrylic for Lasting Waterproofing
Staring at the hardware store aisle, it is tempting to grab the cheapest tube. However, basic painter's caulk dries hard and fails in wet areas. Whenever you use the tub, your weight pushes the floor down slightly, while hot water causes surrounding materials to swell through thermal expansion. This constant flexing is called joint movement, and rigid acrylic easily splits under pressure.
To create a gasket that survives this stress, you need the right product. Here is how the best waterproof sealant for tile compares to cheaper acrylic alternatives:
- Flexibility: 100% silicone stretches to handle shifting weight; silicone-acrylic eventually snaps.
- Water Resistance: Pure silicone repels water permanently, while acrylics slowly dissolve.
- Lifespan: Superior 100% silicone sealant properties ensure it lasts decades without shrinking.
Beyond basic flexibility, high-humidity bathrooms require chemical defences. When buying silicone for showers, always look for anti-fungal additives on the packaging. These specific ingredients act as microscopic shields, preventing those stubborn black mould spots from taking root deep inside the seal where cleaning sprays cannot reach. Choose silicone shower caulk labeled 100% silicone and mould-resistant for the most durable results.
Recurring black mould can mean the seal has failed underneath, not just on the surface. A shower leak inspection confirms whether silicone alone is enough.
Book a shower leak inspectionThe 'Clean Slate' Strategy: Stripping Old Sealant Without Damaging Your Tray
Applying fresh caulk over an existing, mouldy bead guarantees a leaky mess within weeks. Learning how to remove old silicone from shower edges is ninety percent of a successful silicone shower repair. The goal is complete extraction without permanently gouging the surrounding bathtub. Many beginners grab a sharp metal utility knife, but this easily causes deep surface scoring - permanent scratches where water can collect.
If you're unsure how to remove silicone from shower surfaces without scratching, instead of metal, protect acrylic and fibreglass surfaces by relying on a plastic razor blade or a specialist caulking tool. Keep the blade almost flat against the tub to master the low-angle scrape. Pushing forward gently at this shallow angle lifts the bulk of the rubber in one long, satisfying strip rather than tearing it into frustrating little pieces. This mechanical removal handles the heavy lifting of the job.
Even after pulling away that main strip, an invisible, microscopic film remains clinging to the tiles. This stubborn ghost residue prevents new products from sticking. To conquer this final layer, apply a commercial chemical silicone remover. These liquid softeners break down the strong chemical bonds over a few hours, turning the invisible leftovers into a soft mush you can easily wipe away with a thick paper towel.
Once the heavy rubber is gone and the chemical softener has melted the remaining film, your joint will look completely bare. However, those store-bought softeners leave behind an oily film of their own that ruins adhesion.
Why Denatured Alcohol is the Secret to a Professional-Grade Bond
Looking at a bare shower joint, you might think it is ready for fresh sealant. However, invisible oils from chemical softeners and soap scum create a slippery barrier. If applied over this grease, silicone cannot grab the solid tile beneath. This lack of substrate adhesion is the main reason for early failure when you replace shower silicone.
To fix this, use denatured alcohol for surface preparation. This solvent cuts through grease, ensuring your new bead bonds permanently. Follow this three-step preparation checklist:
Scrub away loose debris with a dry nylon brush.
Rinse the area with plain water.
De-grease by wiping aggressively with a rag soaked in denatured or isopropyl alcohol.
Preventing peeling silicone in wet areas also requires absolute dryness. Trapped moisture pushes the new sealant away, ruining the surface tension needed for a strong grip. Run a hair dryer over the joint to evapourate every hidden drop of water.
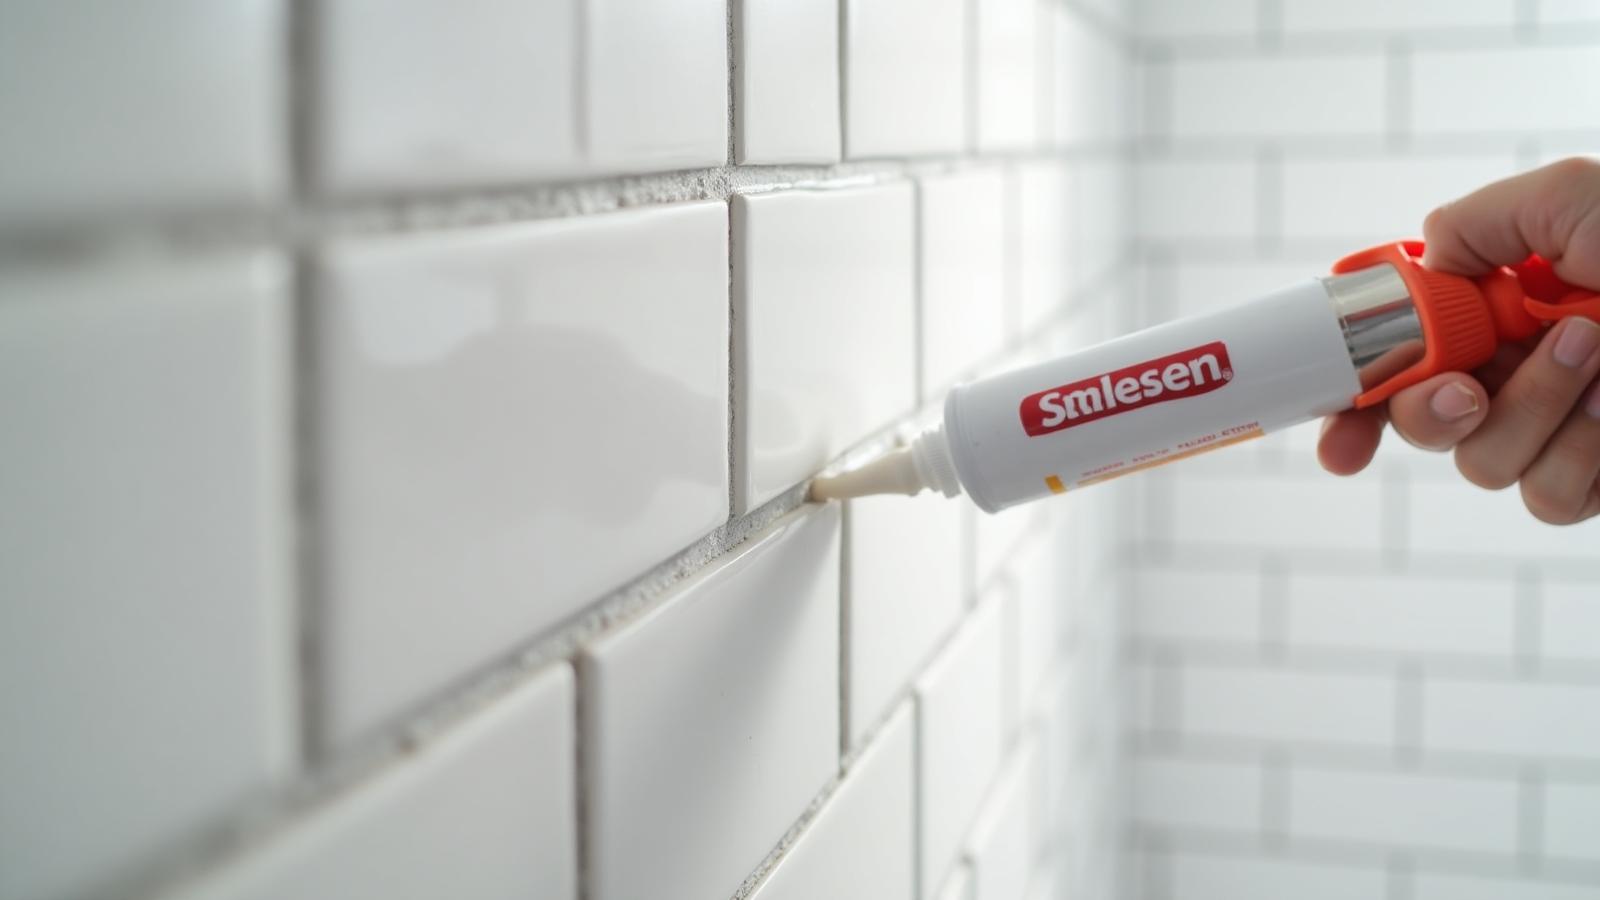
Mastering the 'Caulk Gun' Technique: From Messy Blobs to Smooth Beads
A perfectly clean joint is worthless if the application looks messy. Think of this step like icing a cake, where mastering beading - laying down a continuous line of waterproof sealant - determines your success. Knowing how to re silicone a shower hinges entirely on managing the product's flow. If you need a quick refresher on how to re silicone shower seams, practice on a taped cardboard joint before working on tile.
The secret starts with the plastic tip of your tube. Slice the nozzle at a 45-degree angle, making the opening match the exact width of your tile gap. This specific geometry forces silicone deep into the joint in one smooth pass, rather than letting it sit on top.
Pumping the handle is where beginners often panic and create blobs. Apply constant, steady pressure to the trigger while moving the gun at an even speed toward your body. Pulling too fast breaks the line, while moving too slowly builds up stubborn lumps.
Immediately after, you must perform a step called tooling, which simply means smoothing the wet material into a curved, water-shedding shape. While a caulking tool kit for smooth finish results is highly recommended, a soapy index finger works nicely. Glide it lightly over the fresh joint to press the edges flush against the wall.
Perfecting this technique for applying silicone caulk in shower corners takes just a few minutes of practice. Before you begin pulling the trigger, you need to know exactly what kind of product is in the tube, as the curing process generates distinct fumes.
Acetoxy vs. Neutral Cure: Picking the Right 'Smell' for Your Tiles
Have you ever noticed a strong vinegar smell near a bathroom renovation? That distinct odour comes from the curing process - the invisible chemical reaction that turns wet paste into a solid, rubbery gasket. When gathering supplies for a shower silicone repair, you must choose between acetoxy vs neutral cure silicone. The correct choice depends entirely on your specific tile materials.
To keep your project simple and prevent accidental damage, match the chemical to your surface:
Acetoxy (Vinegar Smell): Choose this for standard ceramic tiles, porcelain, and glass to get a faster, stronger initial grip.
Neutral Cure (Faint Smell): Rely on this for any natural stone like marble or granite, as well as metals and plastics.
That sharp scent is actually acetic acid releasing into the air. While incredibly effective on glass, this byproduct causes acid etching on natural stone, leaving permanent, cloudy burn marks on expensive finishes. A neutral formula prevents this costly mistake while safely waterproofing the edges along your silicone shower grout lines.
The 24-Hour Rule: Why Curing Time is Different from Drying Time
Wondering how long does shower caulk take to dry? In just thirty minutes, your waterproof shower silicone forms a smooth skin and feels dry to the touch. This tack-free time is completely deceptive. Silicone does not dry through evapouration; instead, it relies on atmospheric moisture curing, meaning it acts like a sponge, absorbing bathroom humidity to slowly harden from the outside in.
Reaching full depth of cure - where the rubbery gasket solidifies completely against the back wall - requires patience. When you re silicone shower edges, keep the stall completely off-limits for a minimum of 24 hours. Introducing steam or direct water pressure too early will warp the wet centre, creating permanent surface ripples and hidden weak spots.
Before showering, perform The Finger Test on a scrap piece of leftover silicone squeezed onto cardboard. If it bounces back firmly when pressed, your barrier is solid.
Your Leak-Free Legacy: Maintaining Your New Seal for the Next 5 Years
You started out stressing about fixing leaking shower tray seal issues, and now you have the skills to protect your home from water damage. You just saved yourself a costly contractor bill! Remember, true success is simply a watertight, smooth seal that you can barely notice from the bathroom doorway.
To make your hard work last, implement this maintenance checklist:
Squeegee your tile walls after every use.
Wipe down corners with a towel to prevent standing water.
Clean early signs of pink mould before it penetrates the seal.
Avoid abrasive scrubbing when removing mould from shower joints.
Set a 5-year reminder, since how often to re silicone shower areas depends heavily on daily wear.
You no longer need to dread peeling, black-spotted caulk. Instead of seeing a messy and frustrating chore, you now view this as a highly manageable weekend win. Trust your new skills, apply what you've learned, and enjoy the peace of mind that comes with a perfectly sealed bathroom.
People Also Ask
Peter Kim
Lead Technician — Leak Repair Specialist
Over 15 years of experience in shower and balcony waterproofing solutions across Greater Sydney.